User Guide
Table of Contents
Chapter 1: Introduction / Meet LAD
Chapter 2-1: Installation Tips
Chapter 2-3: Connecting to the Internet
Chapter 4: Configuring a Wireless Network
Chapter 5: Connecting and Managing Clients
Chapter 6: SIP Server / VoIP PBX
Chapter 6-4: Voicemail Boxes / VM Menus
Chapter 6-9: Call Routing & Processing Examples
Chapter 7: Access Controls / Parental Controls
Chapter 10: Network Security / LateralFirewall
Chapter 11: DNS Server and LateralDNS
Chapter 13: Ethernet Packet Capture
Chapter 14: Wireless Packet Capture, Monitoring and Reports
Chapter 15: Settings, NAT Forwarding / Port Mapping and Sys Info
Ethernet Packet Capture
LAD automatically captures and stores all network activity in the form of raw packet data, which may be downloaded as PCAP files. This data may be useful in troubleshooting network issues and for forensic analysis and investigation. PCAP data may be downloaded for individual computers and other devices or for the entire network.
Downloading PCAP Data for an Individual Device
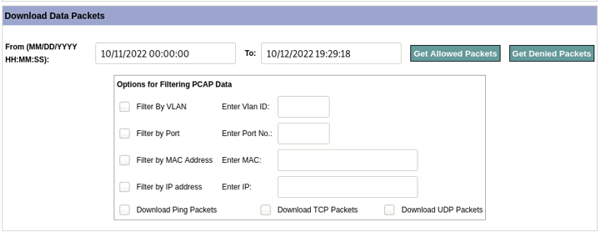
To download PCAP data for an individual computer or other device, find the desired device in the list of devices and click on “Reports & PCAP.” This will open up a new page. Scroll down to the section titled “Download Data Packets.” Enter here the desired date and time range for your download request then click on “Get Allowed Packets” to download all the packets for that specific device that were allowed to traverse LAD or “Get Denied Packets” to get the packets that LAD blocked the device from sending or receiving.

You may also choose to apply several filtering options, such as by VLAN, port, MAC address or IP address. You may also choose to download only ping packets, only TCP packets or only UDP packets.
You may also reach the “Reports and PCAP” page from the individual device’s webpage.
- Packets that are sent to a device while it is disabled would be considered denied packets.
Downloading PCAP Data for the Network
Network PCAP data is accessed from the same page as the LAN/WAN reports. Click on the “Reports” button in the bottom right-hand corner, within the “Network Utilization” section. This will open a new page. At the end of this page is the PCAP section.
Scroll down to the section titled “Download Data Packets.” Enter here the desired date and time range for your download request then click on “Download LAN Packets” to download all the LAN/local packets or “Download WAN Packets” to get the WAN/Internet packets.
Downloading PCAP Data for Individual Network Interfaces
You may also get PCAP data by individual network interface, whose PCAP data is accessed from the individual port pages. Click on the “Ports” button on the main menu page. This will open a new page listing all available ports (network interfaces). Click on the desired port. The form to download PCAP data is towards the middle of the page, in the "PCAP Data" section.
Enter here the desired date and time range for your download request then click on “Download Packets” to download the packets. Below the data range input boxes are available several filtering options.
Setting up Mirror/SPAN Packet Capture
You may designate one or more network interface ports on LAD to receive and record data from a router or switch’s mirror/SPAN port. To do so, from the main menu click on “Ports” and select the desired network interface port from the list.
Checkmark “Receive Only” and save settings.
If you wish the data received on this port to also be mirrored out another port, checkmark “Enable Mirror/Send to” and select the desired destination network interface port from the dropdown menu. Save settings.

Setting up Passthrough / Inline Packet Capture
You may configure a pair of network interface ports to act together for passthrough (aka inline) packet capture. To do so checkmark “Enable Mirror/Send to” for each port and select each other's corresponding network interface port from the dropdown menu. Save settings.

<< Reports | Wireless Packet Capture, Monitoring and Reports >>
